You will receive an ample amount of advice during your lifetime and through parenthood. The one piece of advice that runs through my head as a constant is that their childhood goes by in the blink of an eye. One day you are cradling your newborn and sitting by the bassinet just waiting for them to open their precious eyes. The next minute you are watching them crawl and standing for the very first time. Then he is crawling around the house, giggling and yelling mama!
 |
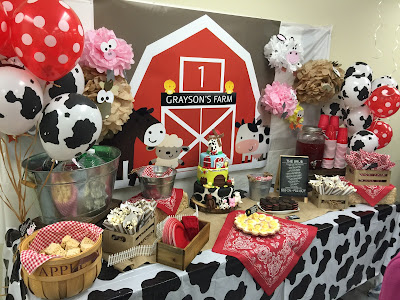
| Barnyard Dessert Table |
We are constantly wondering when they will take their next steps, what they will be when they grow up, and what friends they will have. I have learned to live in the moment and relish in the stage he is currently at. What I have come to realize is that we have to take every moment for what it is. My son has taught me more in 11 months then I ever thought possible. He taught me to learn patience and to not take life so seriously. When he cries, I sing to him and we both relax. I am a planner, that is what I do and your day with an 11 month old will never go as planned. Especially in the era of technology, we find ourselves at arms-length from a phone or computer. I have let go of those ‘objects’ and instead live in the moment with my so. I cradle him and I sing him all the songs I know. I am able to relax with him even during his meltdowns.
Gray will always be the best gift I have ever received. I can’t believe the outpouring love that we were given after Grayson was born. Family and friends visited us at the hospital. At home, we were visited by co-workers, more family and friends who showered Grayson with gifts, brought over lunch and dinner because I wasn’t in any condition to cook and I was so appreciative.
Now at just shy of one years old, he is the smartest little boy I have ever interacted with. (Of course I am partial, but I am allowed bragging rights as I am his mom). He loves to listen to music, play with his three Yorkshire terrier’s and interact with other kids. Above all, he absolutely loves his dogs. I am not sure if it is the fact that they are his height when he crawls or that he loves chasing them when he runs away.
The thought of planning his first birthday was so bittersweet for me. I am such a proud parent for the little man he is becoming, but I also can’t believe my baby is one! I wanted to capture all of his loves into one event, which inspired the barnyard themed birthday.
 |
| Barnyard Invitation |
The invitations… were cow print, barnyard red and burlap. The logo for the party was “Grayson’s Farm” and all of the designs encompassed this theme. The banner at the time highlighted my baby as the guest of honor. The reason behind the theme was based on taking Gray to the local fairs throughout the season and his reaction to all of the animals. His face just lit up with excitement every time he saw an animal. He literally screamed he was so happy. While the party was in December and his party couldn’t be outside with the animals, I still wanted everyone to have just as good of an experience. I wanted his guests to get excited for his big day and to anticipate all of his favorites in one party.
 |
| Barnyard theme Birthday invitation |
The labels had been made and the invitations were sent out. Yes, I made the invitations as well! Now the other preparations had to fall into place. My top investment in the party was going to be the photography. I am usually the person taking the pictures and trying to capture all of the moments of the day. I wanted to leave that task to a professional this time. I wanted my one concern for the day to be making sure Grayson had a good time. I wanted to share every moment with him and let someone capture it. My one year old will never remember the day, but he will always have the photos to look back on. Needless to say, I was referred to MPH Studios. Her pictures speak for themselves and her work is amazing. On the day of his party, Melissa introduced herself and was so sweet. She blended in right with the day and made sure she captured each moment that took place that day.
Putting together the menu selection for his birthday was pretty simple. Grayson is not a picky eater by any means and enjoys all foods. I decided to have the menu correlate with the event theme. For the dessert table we had: marshmallow treats for haystacks, Oreos as tractor wheels, deviled eggs as farm fresh eggs, chocolate covered popcorn as sheep’s fluff, Chex party mix as chicken feed, animal crackers, a watering hole and country fruit punch.
 |
| Salty Chocolate Fluff: Kettle Popcorn with Chocolate |
 |
| Haystacks (Marshmallow Treats) |
The sheep’s fluff was placed in brown and white cones. I designed a template in Photoshop and printed the cones on paper and formed them into a cone shape then adhered them with tape. The deviled eggs are a specialty of my grandma’s (his great-grandma) and they went hand-in-hand with the day’s theme. She was so honored to make them and they went very quickly. The popcorn was kettle corn and I drizzled melted chocolate morsels over them and popped them into the freezer to cool.
 |
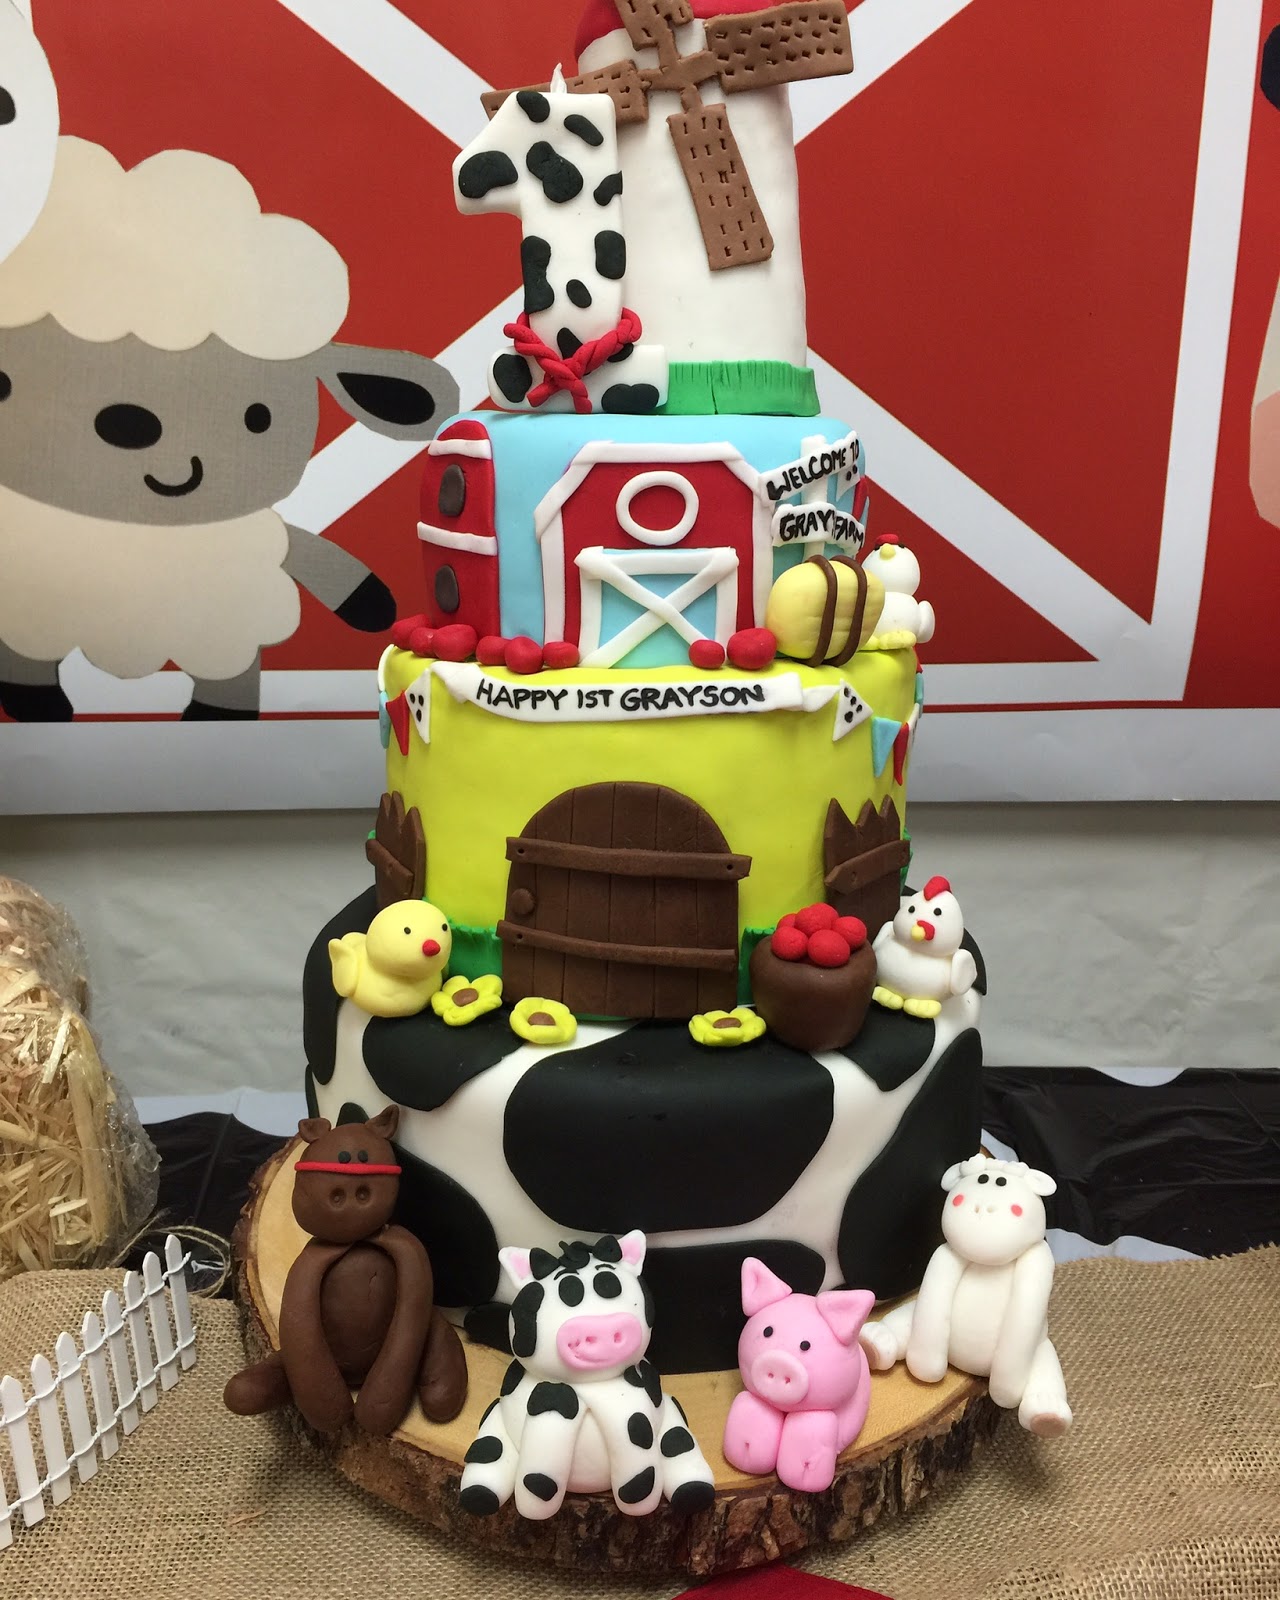
| Barnyard themed Cake |
Most importantly, we had a barnyard themed cake designed and baked by me. The cake was vanilla flavor with vanilla buttercream frosting. The bottom layer was cow print, the middle layer was the barn gate and the top layer was the barn and the finishing touches was the windmill, cow-print one and all of Grayson’s farm animals (the cow, chicken, ducks, horse, pig and sheep). The tablecloth was cow print and a burlap runner was laid down the center of the table. Wooden crates, purchased from Home Goods, were used in the back to prop up the watering hole and fruit punch. Metal buckets and tins held the food. Chalkboard signs were used as food labels and little critters were adhered to each individual sign. Checkered napkins were used inside the metal tins. The backdrop was a banner that I designed and had printed. The banner was created in Photoshop and Indesign. The animals are from the Cricut Critter. I am currently using the Silhouette, but have heard different reviews on both products.
For the main meal we had: hot dogs in crescent rolls (pigs in a blanket), garden salad, basil and cheese pizza, chicken nuggets, peter rabbit’s carrots and fresh pasta with sauce and meatballs (because that is Gray’s favorite meal).
The food went very quickly. I made sure to grab myself a plate and sat down to eat with Grayson. He enjoyed a good helping of pasta and meatballs as well as a chicken nugget. My little boy was very happy to eat, as always!
 |
| Rakes & Shovels (Spoons and Forks) |
 |
| Farm Fresh Eggs |
 |
| Farm-themed Dessert table |
 As an added touch, I decorated Grayson’s high chair. I knew this would be a focal point of the day as Gray would be sitting in his chair to eat lunch and enjoy his cake. I worked with Cathy of Giddy Up Designs on Etsy.
I gave her the colors of the rag ties I wanted to use for his high chair and she took my vision and made a masterpiece. I wanted the burlap to overlap the rag tie garland and have “I am one” to be showcased. She did an amazing job. Another focal point was Grayson’s bibs. Karen Hogan by Tidy Diner’s Bibs and Pads made one of Grayson’s bibs. I asked her for cow print material, his age and name in red lettering and she came through. She actually went to the store the same day to purchase the number one for his bib and I had it in my hands in only a few days.
 |
| (Right) Bib made by Great Grandma (Left) Bib from Karen Hogan |
 |
| Giddy Up Designs |
 |
| One Year G |
The communication and turnaround was more than I could ask for. She was so personable and I really appreciated the effort she put in for me. The second bib was made by Grayson’s Great-Grandmother, which was a complete surprise. She replicated the barn from Grayson’s invitation by using different colored fabric and sewing it on the bib. The intricate design took her days to replicate. What an amazing gift that will be treasured always. A true gift is one that cannot be purchased, one that takes time, effort and love. Thank you Gram.

 For the décor, I had a bulletin board with all of Grayson’s firsts throughout the year. I included a few as there were just too many to pin. Some of his special events were from each holiday, his first vacation to New Orleans, family picnics, his first best friend (his yorkies), trips to the fairgrounds, his half birthday party, and first time in the pool and first taste of solid foods. On the table directly to the right of the board was the word “ONE” in block letters. I purchased the letters from Michael’s Craft Store and the fabric was from Joann Fabrics. I stenciled the letters, cut the fabric with scissors and glued the fabric on the letters with fabric glue. The goody bags were filled with apple sauce, a red spoon, farm animal stickers, animal crackers and bubbles. Bubbles are Grayson’s favorite. Some of the bags had age appropriate goodies such as baby food for the little ones, hair ties for the girls and silly putty for the big kids. The treats were placed inside of a brown paper lunch bag. The labels on the bags were used from Cricut Critter Cutter Design. The plaid paper was created in InDesign Suite. The designs were then printed and adhered to the bags. A sign next to the favors displayed “Little Ladies & Gentlemen, thank you so much for attending my first birthday. Please find your name and take your gifts.”
 Alongside the party favors was his guestbook. I used Dr. Seuss’ Happy Birthday To You for all of his family and friends to sign. The frame displayed Grayson’s Book. “STOP HERE YOU SEE! And write a special message to me. Share a birthday wish, or just say hi to your most favorite guy. Write your note on any page. This is something I will cherish at any age.” I thought this was just an added touch and something he could cherish forever. Grayson loves me to read to him, although he primarily enjoys opening and closing the book. As he is older, I will be able to read everyone note that they left for him and he will be able to see who attended his first birthday. Just in front of the guest book was handmade Polaroid pictures with Grayson’s monthly photos. The intention was to have the close pins clip the polaroid’s and have them standing on the table, but with all the movement at the table, I decided it would be best if they laid flat. I couldn’t believe how much he changed from the day we brought him home compared to a year later. His hair is now lighter, he has grown tremendously in length, but one thing has remained the same, his energy. He kicked all the time in my belly and remains on the move as a one year old. The ultrasound tech did warn me as he kept moving each time she tried to get a good image. She said this one will keep you on your toes. She was certainly right.

 The tables where guests sat were draped with brown linen tablecloths. Each place setting had paper grass and a farm animal critter paper plate. The animals were a pig, horse, cow and sheep. The cut outs were created in InDesign. They were then printed and adhered to the paper plates. The centerpieces were barrels of hay, a red bandana formed into a triangle and a blue or red cowboy hat. The little guests were able to take the cowboy hats home.
 For the kids, I created a Craft Corner. I laid out a few coloring books and crayons for the little ladies and gentlemen to color. A plaid tablecloth was used to overlay the table. The chalkboard sign was from Michaels Crafts. The crayons, coloring books and jar were purchased from the Dollar Store. I had one sheet of paper for each letter of Grayson’s name.
 We toyed with the idea of games to have for his party. A couple weeks back we went to the library for a Saturday Sing Along. This is where we met Edward Leonard. Grayson enjoys music and moves to the beat with his entire body. Whether you start to sing or you put on the radio, Grayson will get in the rhythm.
I can't help it but smile when I watch him. Grayson really took to the entertainment and one of Edward’s songs was Old McDonald. Edward was available for the day of Grayson’s party and he was a hit for all of the kids. We placed kid’s chairs front and center and all of the children listened and danced to the music. About 30 minutes in and before Happy Birthday was sung, the birthday boy fell fast asleep. It was long before his nap time, but between the excitement and the music, he was done for the day. I enjoyed having him in my lap and he snuggled right up to my chin. That is what makes it all worthwhile.
Most importantly, our attire. But first, a cute side-story. Every weekend, I will get Grayson dressed. My husband will then try and coordinate a matching outfit based on what Grayson is wearing for the day. With
my husband’s extensive wardrobe it is not that hard to find something to match with our son. Although there is the rare occasion that he cannot coordinate and my husband asks me if it Grayson could wear something else. For holiday events and photos we always coordinate our outfits. Most people do that, right? For the day of Grayson’s party, we all wore checkered print shirts. Grayson was in a red and black polo with corduroy overalls from Carter’s kids. Our shirts were purchased from J.Crew Factory.
By now, not only have you received the full low-down from the party, but you also know that I am extremely detail-oriented due to the complexity of this blog post. I planned this party for months and each detail was so important to me because he is my baby. I hope you enjoyed hearing about the details as much as I enjoyed planning his day. Until his next birthday… We love you Grayson and are so proud of the little man you are growing up to be. xoxo
Amanda Piscitelli
Owner of Living with Amanda